
Steps:
How to install the receiver dish
- Find a location with a wide view of the sky. A high point on your building is usually the best position , so on the roof or a balcony is ideal. To find the angle of the satellite, use an analog compass. In our example, you would point your compass to 95° southwest.
- Ensure you attach the dish securely. It must be able to resist a large amount of wind force due to its shape. If you mount the dish on a wooden roof, waterproof the base by caulking around it.
- Point the dish to 95° southwest and tilt it up. The screw that controls the direction adjustment needs to be tightened, but not completely as you will still need to move it again.
- Connect the satellite finder and enter the name of the satellite, in this case Galaxy 3C, and the down-link frequency number (11780 Hz). You should hear a beeping that is continuous except for a quiet interval.
5. Adjust horizontal angle of dish.
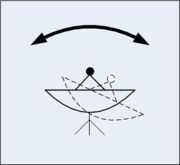
6. Rotate the dish horizontally and listen to the beeps. If the interval between the beeps gets shorter then you are moving in the right direction. If it gets longer, then you need to rotate the dish the other way. Now tighten the screw controlling the horizontal rotation fully to fix this angle.
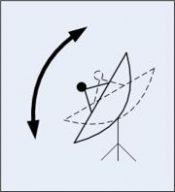
7. Adjust vertical tilt of dish, doing the same thing as before using the beeps. Once this is set, the dish will be positioned to catch the best possible satellite signal.
8. Connect the coaxial cable to the satellite dish and drill a hole in the wall to run the cable through into the house. Check first for pipes and cables etc. before drilling.
9. Connect the receiver to the cable and this side of things is done.